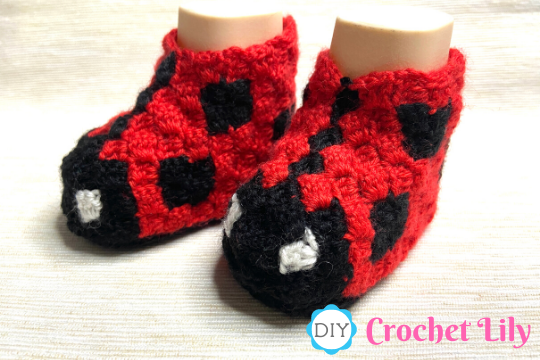
I continue to make patterns for crochet baby booties using the corner-to-corner technique. In this tutorial, I crochet baby booties in the form of ladybugs.
In this tutorial, you will find a step-by-step description of how to crochet cute Ladybug C2C crochet baby booties.
You can add this picture with the cute Ladybug C2C crochet baby booties to the board in Pinterest so as not to lose the interesting idea of crocheting baby booties.
Prepare your favorite crochet hook and yarn for crocheting cute Ladybug C2C crochet baby booties.
I provide a pixel chart below, but if you need help figuring out how to crochet in C2C technique (corner to corner), please refer to my publications "How to Crochet Corner to Corner (C2C)" and "How to Decrease in C2C Crochet", which has a photo instructions.
- Crochet hook, size 2,20 mm.
My Favorite Crochet Hook - Etimo Rose Tulip.
- Yarn (colors: red, white, black) - I use yarn Alize baby wool (175 m/50 g).
Materials and tools:
- Crochet hook, size 2,20 mm.
My Favorite Crochet Hook - Etimo Rose Tulip.
- Yarn (colors: red, white, black) - I use yarn Alize baby wool (175 m/50 g).
- Yarn Alize Baby Wool (175m/50g).
- Crochet Hook (size 2,2 mm).
- Plastic crochet markers
- Scissors
To crochet baby booties, you will need to crochet one whole piece using the C2C technique. To do this, use this pattern. Crochet only in the red and black areas.
To create this pattern, I used a baby foot mannequin. I measured the girth of the base. This is 22 cm.
Half of this length is 11 cm. When using Alize baby wool yarn, the number of cells for this length should be 12.
Abbreviations for crochet in this tutorial:
- Chain - ch
- Slip stitch - sl st
- Single crochet - sc
- Half double crochet - hdc
- Double crochet - dc
- Double crochet - dc
- Chain space - ch sp
Start making a cute Ladybug C2C crochet baby booties.
Take a red yarn.
Stage 1. Crochet the main piece for the baby's booties.
At the beginning of crocheting the main piece, leave a long thread. This thread can then be used to stitch the finished part around the edges. Using the pattern, crochet the first 7 rows using the c2c crochet technique.
From row 8, start decreasing along the top row. It will be necessary to decrease at the top from 8 to 12 rows.
In the 13th row, you need to make a decrease on both sides.
In row 14, continue decreasing on both sides.
In row 16, continue to increase.
From 17 to 21 rows in the red sector it is necessary to make an increase. Starting from the 22nd row, you need to make a decrease on both sides.
Sew the two sides of the piece. Sew the two pieces together using the thread you left at the beginning of the crochet.
Sew together the two short black sections at the front of the bootie.
Stage 2. Crochet the sole of the booties.
Row 1. Make ch 16, in 4th ch from the hook make 1 dc, in each of next 11 loops make 1 dc, in last loop make 5 dc, in each of next 11 loops make 1 dc, in last loop make 3 dc, 1 sl st in 3rd ch.
Row 2. Make ch 2, 2 dc in same loop, in next loop make 2 dc, in each of next 11 loops make 1 dc, in each of next 5 loops make 2 dc, in each of next 11 loops make 1 dc, in each of next 3 loops make 2 dc, 1 sl st in the top of dc.
Row 3. Make ch 2, 2 dc in same loop, in each of next 2 loops make 2 dc, in each of next 13 loops make 1 dc, in each of next 8 loops make 2 dc, in each of next 13 loops make 1 dc, in each of next 5 loops make 2 dc, 1 sl st in the top of dc.
Row 4. Make ch 1, in each of next loops make 1 sc, 1 sl st in the top of sc.
Finish crocheting this sole and leave a long thread. You can use this long thread to sew the sole and the main part of the bootie.
Sew the sole to the main part of the bootie. For convenience, fasten the middle of the back of the bootie to the middle of the back of the sole. Do the same for the front.


No comments:
Post a Comment