Monday, April 15, 2024

How to Crochet a Cat Mat. Crochet in the C2C technique.

I looked at a small wooden house for my cat. And I decided to make a small mat for this house. And during the process of crocheting this mat, I will share moments that will be useful for those who want to crochet the same mat.

You can add this picture with a crocheted cat mat to the board in Pinterest so as not to lose the interesting idea of crocheting an advent calendar bag.


To crochet a mat, you will need 2 square canvases, which in the future will need to be folded together and connected along the edge. For this reason, both canvases should be the same size. Since I will use different yarns from my stocks, the thickness will need to be selected approximately the same so that the finished fabrics are the same.

The thickness of the yarn was selected so that the size of 1 cell of the crocheting pattern corresponded to 1 cm. This is the most convenient way to navigate by size. I did the scheme myself. The size of the scheme turned out to be 35* 35 cells, since the mat needs a size of 35 * 35 cm or in inches 14 * 14.

I provide a pixel chart below, but if you need help figuring out how to crochet in C2C technique (corner to corner), please refer to my publications "How to Crochet Corner to Corner (C2C)" and "How to Decrease in C2C Crochet", which has a photo instructions.

Materials and tools:

- Crochet hook, size 2,5 mm.

- Yarn (colors: orange, gray, red, black,yellow, pink) (160-180 m/50 g).

C2C patterns:

Size: 35*35 blocks.

The first part of the mat.


Symbols by colors in the diagram.


A written description from row to row.

RS - The right side

WS - The wrong side

The direction of crocheting in the c2c technique is from the lower right corner to the upper left corner.

↙ Row 1 [RS]: (pin) (1 stitch).
↗ Row 2 [WS]: (pin) x 2 (2 stitches).
↙ Row 3 [RS]: (pin) x 3 (3 stitches).
↗ Row 4 [WS]: (pin) x 4 (4 stitches).
↙ Row 5 [RS]: (pin) x 5 (5 stitches).
↗ Row 6 [WS]: (pin) x 6 (6 stitches).
↙ Row 7 [RS]: (pin) x 7 (7 stitches).
↗ Row 8 [WS]: (pin) x 8 (8 stitches).
↙ Row 9 [RS]: (pin) x 9 (9 stitches).
↗ Row 10 [WS]: (pin) x 10 (10 stitches).
↙ Row 11 [RS]: (pin) x 11 (11 stitches).
↗ Row 12 [WS]: (pin) x 12 (12 stitches).
↙ Row 13 [RS]: (pin) x 13 (13 stitches).
↗ Row 14 [WS]: (pin) x 14 (14 stitches).
↙ Row 15 [RS]: (pin) x 15 (15 stitches).
↗ Row 16 [WS]: (pin) x 14, (bla), (pin) (16 stitches).
↙ Row 17 [RS]: (pin) x 2, (bla), (pin) x 14 (17 stitches).
↗ Row 18 [WS]: (pin) x 10, (gra), (pin) x 3, (bla), (pin) x 3 (18 stitches).
↙ Row 19 [RS]: (pin) x 3, (bla), (pin) x 2, (gra) x 4, (pin) x 9 (19 stitches).
↗ Row 20 [WS]: (pin) x 9, (gra) x 6, (bla), (pin) x 2, (bla), (pin) (20 stitches).
↙ Row 21 [RS]: (pin) x 2, (bla) x 2, (pin), (bla), (gra) x 7, (pin) x 8 (21 stitches).
↗ Row 22 [WS]: (pin) x 7, (gra) x 10, (bla) x 2, (pin) x 3 (22 stitches).
↙ Row 23 [RS]: (pin) x 5, (bla), (gra) x 10, (pin) x 7 (23 stitches).
↗ Row 24 [WS]: (pin) x 7, (gra) x 12, (pin) x 5 (24 stitches).
↙ Row 25 [RS]: (pin) x 5, (gra) x 13, (pin) x 7 (25 stitches).
↗ Row 26 [WS]: (pin) x 7, (gra) x 3, (bla) x 2, (gra) x 8, (pin) x 6 (26 stitches).
↙ Row 27 [RS]: (pin) x 6, (gra) x 10, (bla), (gra) x 3, (pin) x 7 (27 stitches).
↗ Row 28 [WS]: (pin) x 7, (gra) x 9, (yel) x 2, (gra) x 4, (pin) x 6 (28 stitches).
↙ Row 29 [RS]: (pin) x 7, (gra) x 4, (bla), (yel), (gra) x 4, (bla) x 2, (gra) x 2, (pin) x 8 (29 stitches).
↗ Row 30 [WS]: (pin) x 8, (gra) x 2, (bla), (gra), (bla), (gra) x 4, (bla), (yel), (gra) x 4, (pin) x 7 (30 stitches).
↙ Row 31 [RS]: (pin) x 7, (gra) x 5, (yel) x 2, (gra) x 3, (bla), (gra) x 5, (pin) x 8 (31 stitches).
↗ Row 32 [WS]: (pin) x 2, (red) x 4, (pin) x 3, (gra) x 2, (bla), (gra) x 11, (dpin), (gra), (pin) x 7 (32 stitches).
↙ Row 33 [RS]: (pin) x 7, (gra), (dpin), (gra) x 7, (dpin) x 2, (gra) x 6, (pin) x 2, (red) x 4, (pin) x 3 (33 stitches).
↗ Row 34 [WS]: (pin) x 3, (red) x 4, (pin) x 2, (gra) x 7, (dpin), (gra) x 7, (dpin) x 2, (gra), (pin) x 7 (34 stitches).
↙ Row 35 [RS]: (pin) x 7, (gra), (dpin) x 3, (gra) x 7, (dpin), (gra) x 7, (pin), (red) x 4, (pin) x 4 (35 stitches).

Corner

 
↗ Row 36 [WS]: (pin) x 3, (red) x 4, (pin) x 2, (gra) x 15, (dpin) x 3, (gra), (pin) x 6 (34 stitches).
↙ Row 37 [RS]: (pin) x 6, (dpin) x 4, (gra) x 15, (pin) x 3, (red) x 2, (pin) x 3 (33 stitches).
↗ Row 38 [WS]: (pin) x 2, (red) x 3, (pin) x 2, (gra) x 16, (dpin) x 3, (gra), (pin) x 5 (32 stitches).
↙ Row 39 [RS]: (pin) x 5, (gra) x 12, (yel) x 2, (gra) x 5, (pin) x 3, (red) x 2, (pin) x 2 (31 stitches).
↗ Row 40 [WS]: (pin) x 7, (gra) x 4, (yel), (bla), (gra) x 8, (pin) x 9 (30 stitches).
↙ Row 41 [RS]: (pin) x 9, (gra) x 7, (yel), (bla), (gra) x 5, (pin) x 6 (29 stitches).
↗ Row 42 [WS]: (pin) x 6, (gra) x 4, (yel) x 2, (gra) x 8, (pin) x 8 (28 stitches).
↙ Row 43 [RS]: (pin) x 8, (gra) x 13, (pin) x 6 (27 stitches).
↗ Row 44 [WS]: (pin) x 5, (gra) x 13, (pin) x 8 (26 stitches).
↙ Row 45 [RS]: (pin) x 8, (gra) x 11, (bla), (pin) x 5 (25 stitches).
↗ Row 46 [WS]: (pin) x 3, (bla) x 2, (gra) x 11, (pin) x 8 (24 stitches).
↙ Row 47 [RS]: (pin) x 9, (gra) x 8, (bla), (pin), (bla) x 2, (pin) x 2 (23 stitches).
↗ Row 48 [WS]: (pin), (bla), (pin) x 2, (bla), (gra) x 8, (pin) x 9 (22 stitches).
↙ Row 49 [RS]: (pin) x 8, (gra), (dpin) x 2, (gra) x 5, (pin), (bla), (pin) x 3 (21 stitches).
↗ Row 50 [WS]: (pin) x 3, (bla), (pin) x 2, (gra) x 2, (dpin) x 4, (pin) x 8 (20 stitches).
↙ Row 51 [RS]: (pin) x 7, (gra), (dpin) x 3, (gra), (pin) x 4, (bla), (pin) x 2 (19 stitches).
↗ Row 52 [WS]: (pin), (bla), (pin) x 5, (gra), (dpin) x 3, (pin) x 7 (18 stitches).
↙ Row 53 [RS]: (pin) x 6, (gra), (dpin) x 2, (gra), (pin) x 7 (17 stitches).
↗ Row 54 [WS]: (pin) x 7, (gra), (dpin) x 2, (pin) x 6 (16 stitches).
↙ Row 55 [RS]: (pin) x 5, (gra), (dpin), (gra), (pin) x 7 (15 stitches).
↗ Row 56 [WS]: (pin) x 7, (gra) x 2, (pin) x 5 (14 stitches).
↙ Row 57 [RS]: (pin) x 13 (13 stitches).
↗ Row 58 [WS]: (pin) x 12 (12 stitches).
↙ Row 59 [RS]: (pin) x 11 (11 stitches).
↗ Row 60 [WS]: (pin) x 10 (10 stitches).
↙ Row 61 [RS]: (pin) x 9 (9 stitches).
↗ Row 62 [WS]: (pin) x 8 (8 stitches).
↙ Row 63 [RS]: (pin) x 7 (7 stitches).
↗ Row 64 [WS]: (pin) x 6 (6 stitches).
↙ Row 65 [RS]: (pin) x 5 (5 stitches).
↗ Row 66 [WS]: (pin) x 4 (4 stitches).
↙ Row 67 [RS]: (pin) x 3 (3 stitches).
↗ Row 68 [WS]: (pin) x 2 (2 stitches).
↙ Row 69 [RS]: (pin) (1 stitch).

Total: (red) x 27, (yel) x 12, (bla) x 37, (gra) x 375, (pin) x 736, (dpin) x 38.

The second part of the mat.

There is no need for a written description for this part of the mat. When crocheting this square fabric, the color of the thread needs to be changed every 3 rows.


A ready-made cat mat, crocheted in the C2C technique.

And now the mat is ready. On the sides, I connected both parts side by side from the alternation of 1 sc and ch 2. I usually tie such a row as a base for different bindings of the canvas, connected in the technique C2C. In this case, it is a way of connecting two canvases together and the columns must be tied into two canvases at once in the same place on the side of the square.


My "client" approved the finished work and was terribly unhappy with the fact that for some reason it was necessary to leave the mat so that for some reason someone would take pictures of it.


I will be glad to receive your likes!

If you have any questions, write in the comments and we'll talk.

Subscribe to the channel to see my posts about crocheting more often (including in the C2C technique).

💰 You can support my blog with donations 💰

My Boosty - https://boosty.to/crochetc2clily/donate

Friday, May 12, 2023

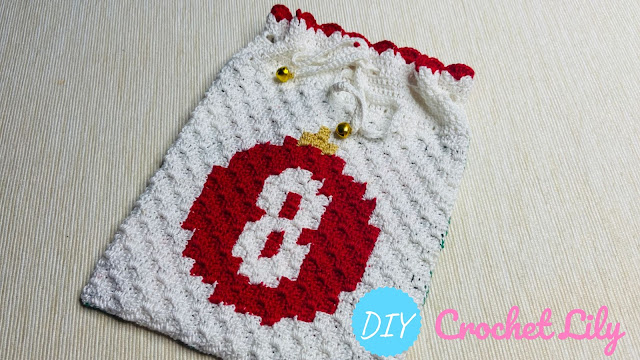
[C2C Crochet] The Eighth day advent calendar bag (corner to corner technique).

 I continue to prepare for the next New Year. This time I crocheted in the C2C technique a bag for the Advent Calendar with the number eight.

In this step-by-step tutorial, I'll introduce you to crochet with a corner-to-corner crochet technique that I use to crochet a eighth day advent calendar bag. I suggest you crochet just such a eighth day advent calendar bag with the image of a Christmas ball with number 8.


Video review of the eighth day advent calendar bag with the image of 
a Christmas ball with number 8.

You can add this picture with a Christmas ball with number 8 to the board in Pinterest so as not to lose the interesting idea of crocheting an advent calendar bag.


Prepare your favorite crochet hook and thin yarn for crocheting a eighth day advent calendar bag with a Christmas ball with number 8 using C2C technique.

I provide a pixel chart below, but if you need help figuring out how to crochet in C2C technique (corner to corner), please refer to my publications "How to Crochet Corner to Corner (C2C)" and "How to Decrease in C2C Crochet", which has a photo instructions.

Materials and tools:

- Crochet hook, size 1,25 mm.

My Favorite Crochet Hook - Etimo Rose Tulip. 

- Thin yarn (colors: beige, white, red) - I use yarn Anna 16, Seam (530 m/100 g).


C2C pattern:

Size: 21*21 blocks.


Written instruction for C2C pattern:

RS
 = Right Side.
WS = Wrong Side.

↙ - Way down.
↗ - Way up.


↙ Row 1 [RS]: (wh) x 1 (1 stitch)
↗ Row 2 [WS]: (wh) x 2 (2 stitches)
↙ Row 3 [RS]: (wh) x 3 (3 stitches)
↗ Row 4 [WS]: (wh) x 4 (4 stitches)
↙ Row 5 [RS]: (wh) x 5 (5 stitches)
↗ Row 6 [WS]: (wh) x 6 (6 stitches)
↙ Row 7 [RS]: (wh) x 7 (7 stitches)
↗ Row 8 [WS]: (wh) x 8 (8 stitches)
↙ Row 9 [RS]: (wh) x 9 (9 stitches)
↗ Row 10 [WS]: (wh) x 10 (10 stitches)
↙ Row 11 [RS]: (wh) x 5, (re) x 2, (wh) x 4 (11 stitches)
↗ Row 12 [WS]: (wh) x 3, (re) x 5, (wh) x 4 (12 stitches)
↙ Row 13 [RS]: (wh) x 4, (re) x 6, (wh) x 3 (13 stitches)
↗ Row 14 [WS]: (wh) x 3, (re) x 7, (wh) x 4 (14 stitches)
↙ Row 15 [RS]: (wh) x 4, (re) x 4, (wh) x 2, (re) x 2, (wh) x 3 (15 stitches)
↗ Row 16 [WS]: (wh) x 3, (re) x 2, (wh) x 3, (re) x 4, (wh) x 4 (16 stitches)
↙ Row 17 [RS]: (wh) x 5, (re) x 3, (wh) x 4, (re) x 1, (wh) x 4 (17 stitches)
↗ Row 18 [WS]: (wh) x 4, (re) x 2, (wh) x 1, (re) x 1, (wh) x 1, (re) x 4, (wh) x 5 (18 stitches)
↙ Row 19 [RS]: (wh) x 5, (re) x 3, (wh) x 2, (re) x 1, (wh) x 2, (re) x 2, (wh) x 4 (19 stitches)
↗ Row 20 [WS]: (wh) x 5, (re) x 2, (wh) x 5, (re) x 2, (wh) x 6 (20 stitches)
↙ Row 21 [RS]: (wh) x 6, (re) x 2, (wh) x 2, (re) x 1, (wh) x 2, (re) x 3, (wh) x 5 (21 stitches)

 
Corner

 
↗ Row 22 [WS]: (wh) x 5, (re) x 4, (wh) x 1, (re) x 1, (wh) x 1, (re) x 2, (wh) x 6 (20 stitches)
↙ Row 23 [RS]: (wh) x 6, (re) x 1, (wh) x 4, (re) x 3, (wh) x 5 (19 stitches)
↗ Row 24 [WS]: (wh) x 4, (re) x 4, (wh) x 3, (re) x 2, (wh) x 5 (18 stitches)
↙ Row 25 [RS]: (wh) x 5, (re) x 2, (wh) x 2, (re) x 4, (wh) x 4 (17 stitches)
↗ Row 26 [WS]: (wh) x 4, (re) x 7, (be) x 1, (wh) x 4 (16 stitches)
↙ Row 27 [RS]: (wh) x 4, (be) x 1, (re) x 6, (wh) x 4 (15 stitches)
↗ Row 28 [WS]: (wh) x 4, (re) x 5, (be) x 2, (wh) x 3 (14 stitches)
↙ Row 29 [RS]: (wh) x 6, (re) x 2, (wh) x 5 (13 stitches)
↗ Row 30 [WS]: (wh) x 12 (12 stitches)
↙ Row 31 [RS]: (wh) x 11 (11 stitches)
↗ Row 32 [WS]: (wh) x 10 (10 stitches)
↙ Row 33 [RS]: (wh) x 9 (9 stitches)
↗ Row 34 [WS]: (wh) x 8 (8 stitches)
↙ Row 35 [RS]: (wh) x 7 (7 stitches)
↗ Row 36 [WS]: (wh) x 6 (6 stitches)
↙ Row 37 [RS]: (wh) x 5 (5 stitches)
↗ Row 38 [WS]: (wh) x 4 (4 stitches)
↙ Row 39 [RS]: (wh) x 3 (3 stitches)
↗ Row 40 [WS]: (wh) x 2 (2 stitches)
↙ Row 41 [RS]: (wh) x 1 (1 stitch)

Total: (re) x 102, (be) x 4, (wh) x 335

I made the Christmas tree ball square pattern with the number 8.

Fasten the working thread on the wrong side to hide it.

The C2C pattern for the first side of the Advent calendar bag can be found on the blog - https://diycrochetlily.blogspot.com/2021/10/c2c-crochet-christmas-c2c-crochet-cup.html


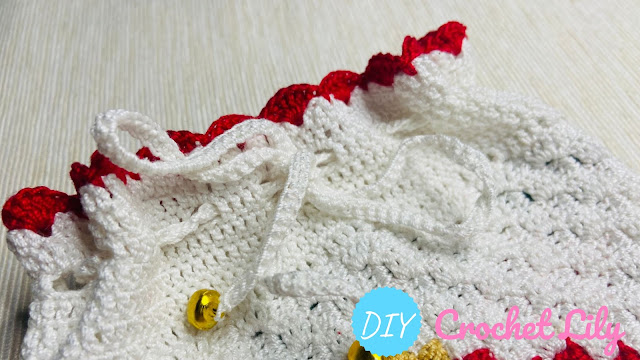
To create an Advent calendar bag, sew two squares on three sides, leaving the top open. Next, on the upper sides, you need to crochet several rows with a double crochet. Closer to the edge, you will need to crochet a sequence with a double crochet with chain space between doble crochet to make a section for the lace with ties for the bag. The number of lace holes must be even.

After this row, you need to crochet 3 more rows of double crochet.

Crochet a lace for the Advent calendar bag in a way convenient for you. Thread the lace through the holes and tighten.


The Eighth advent calendar bag is ready. If desired, you can sew a fabric lining into this bag. You can decorate the top edge of the advent calendar bag.


Finished size of a Christmas ball with number 8 С2С advent calendar bag: 5,5"×7" although yours may be slighting smaller or bigger depending on your tension.


Sunday, May 8, 2022

[C2C Crochet] The Candy pattern C2C Crochet Cup Coaster.

I plan to use ready-made squares crocheted in the C2C technique to create bags for small things. Simple squares can be used as a cup coaster. This tutorial presents a pattern for crocheting a cup coaster with a candy.


In this step-by-step tutorial, I'll introduce you to crochet with a corner-to-corner crochet technique that I use to crochet cup coasters. I suggest you crochet just such a cup coaster with the image of Candy.


You can add this picture with the Candy cup coaster to the board in Pinterest so as not to lose the interesting idea of crocheting a cup coaster.


Prepare your favorite crochet hook and thin yarn for crocheting a cup coaster with an Elephant using C2C technique.

I provide a pixel chart below, but if you need help figuring out how to crochet in C2C technique (corner to corner), please refer to my publications "How to Crochet Corner to Corner (C2C)" and "How to Decrease in C2C Crochet", which has a photo instructions.


Materials and tools:

- Crochet hook, size 1,25 mm.

- Yarn Anna 16, Seam (530 m/100 g). 
- Crochet Hook (size 1,25 mm). 

- Thin yarn (colors: pink, yellow, white, dark pink) - I use yarn Anna 16, Seam (530 m/100 g).

[C2C Crochet] The C2C crochet cup coaster with the buffalo pattern.

The next pattern for a cup coaster with a buffalo pattern is ready. To crochet from corner to corner of such a cup coaster, you only need two colors of yarn - red and black.

In this step-by-step tutorial, I'll introduce you to crochet with a corner-to-corner crochet technique that I use to crochet cup coasters. I suggest you crochet just such a cup coaster with the buffalo pattern.


You can add this picture with cup coaster with the buffalo pattern in Pinterest so as not to lose the interesting idea of crocheting a cup coaster.


Prepare your favorite crochet hook and thin yarn for crocheting a cup coaster with the buffalo pattern using C2C technique.

I provide a pixel chart below, but if you need help figuring out how to crochet in C2C technique (corner to corner), please refer to my publications "How to Crochet Corner to Corner (C2C)" and "How to Decrease in C2C Crochet", which has a photo instructions.


Materials and tools:

- Crochet hook, size 1,25 mm.

- Yarn Anna 16, Seam (530 m/100 g). 
- Crochet Hook (size 1,25 mm). 

- Thin yarn (colors: red, white, green) - I use yarn Anna 16, Seam (530 m/100 g).

Saturday, May 7, 2022

[C2C Crochet] Sunflower C2C Crochet Coaster for Cup.

Spring heat will come very soon, but now I want to get as much solar heat as possible. To do this, I decided to connect the cup holder with the image of the sunniest flower - a sunflower. I will share with you the C2C model of this cup holder. To crochet this cup holder, I used the C2C crochet technique.

And this is how the finished Sunflower C2C cup coaster looks.


You can add this picture to your board in Pinterest, so as not to lose an interesting idea for crocheting.


Prepare your favorite crochet hook and yarn for crocheting a cup coaster using C2C technique. I provide a pixel chart below, but if you need help figuring out how to crochet in C2C technique (corner to corner), please refer to my publications "How to Crochet Corner to Corner (C2C)" and "How to Decrease in C2C Crochet", which has a photo instructions.


Materials and tools:

- Crochet hook, size 1,25 mm.

- Yarn Anna 16, Seam (530 m/100 g). 
- Crochet Hook (size 1,25 mm). 

- Thin yarn (colors: green, white, yellow, brown, dark brown) - I use yarn Anna 16, Seam (530 m/100 g).
- Needle.


[Etsy] C2C Pattern Crochet Blanket Pastel hearts with written instructions.

Now in the process:

Day 8: 96-102 rows.


**NOT A FINISHED PRODUCT. PATTERNS ONLY**

This listing is an instant download and will be available as soon as your order is processed.

This is a c2c pattern that is 71х80 squares, approximate finished size is 27"x31" (if you use yarn Alize Baby Wool - 175m/50g).

- Yarn Alize Baby Wool (175m/50g). 
- Crochet Hook (size 2,5 mm). 

[C2C Crochet] The Car with road pattern C2C Crochet Pillow Case.

One of my c2c blanket patterns contains a drawing of a car. I decided to make a pillowcase pattern with the same car and road pattern.

In this step-by-step tutorial, I'll introduce you to crochet with a corner-to-corner crochet technique that I use to crochet pillow case. I suggest you crochet just such a pillow case with the image of a car with a road.

As of today, part of this pillowcase is ready, but as soon as I start crocheting, a photo of the finished work will appear here.


Video review of the pillow case with the image of a car with a road (will be added later).

You can add this picture with the pillow case to the board in Pinterest so as not to lose the interesting idea of crocheting a pillow case.


Prepare your favorite crochet hook and yarn for crocheting a pillow case with a car with a road using C2C technique.

I provide a pixel chart below, but if you need help figuring out how to crochet in C2C technique (corner to corner), please refer to my publications "How to Crochet Corner to Corner (C2C)" and "How to Decrease in C2C Crochet", which has a photo instructions.


Materials and tools:

- Crochet hook, size 2,20 mm.

My Favorite Crochet Hook - Etimo Rose Tulip. 

- Yarn (colors: gray, white, light blue, red, blue, black, yellow) - I use yarn Alize baby wool (175 m/50 g).

- Yarn Alize Baby Wool (175m/50g). 
- Crochet Hook (size 2,2 mm). 

[C2C Crochet] The Musical notes C2C Crochet Cup Coaster.

Music lovers will love such a cup holder with a note and hearts. You can crochet such a cup holder using the crochet technique C2C.


You can add this picture with musical notes to your board in Pinterest, so as not to lose an interesting idea for С2С crocheting.


Prepare your favorite crochet hook and yarn for crocheting a cup coaster using C2C technique. I provide a pixel chart below, but if you need help figuring out how to crochet in C2C technique (corner to corner), please refer to my publications "How to Crochet Corner to Corner (C2C)" and "How to Decrease in C2C Crochet", which has a photo instructions.

Materials and tools:

- Crochet hook, size 1,25 mm.

- Yarn Anna 16, Seam (530 m/100 g). 
- Crochet Hook (size 1,25 mm). 

- Thin yarn (colors: white, black, red) - I use yarn Anna 16, Seam (530 m/100 g).

[C2C Crochet] The Sweet Watermelon C2C Crochet Cup Coaster.

As an idea for a new stand for a cup, I chose an image of a watermelon with eyes and a mouth. Crocheted stand for cups using C2C technique. Crochet the same cute cup holder.


You can add this picture to your board in Pinterest, so as not to lose an interesting idea for С2С crocheting.


Prepare your favorite crochet hook and yarn for crocheting a cup coaster using C2C technique. I provide a pixel chart below, but if you need help figuring out how to crochet in C2C technique (corner to corner), please refer to my publications "How to Crochet Corner to Corner (C2C)" and "How to Decrease in C2C Crochet", which has a photo instructions.


Materials and tools:

- Crochet hook, size 1,25 mm.

- Yarn Anna 16, Seam (530 m/100 g). 
- Crochet Hook (size 1,25 mm). 

- Thin yarn (colors: green, dark green, white, pink, dark pink, black) - I use yarn Anna 16, Seam (530 m/100 g).

[C2C Crochet] Colorful Squares C2C Crochet Cup Coaster.

I like to use bright colors in my crochet patterns C2C. This time I made a pattern with colorful squares, each of which contains 5 geometric shapes in different colors. The different arrangement of color in the square helped to make a plaid with an interesting geometric pattern. And I used part of the picture to create the pattern of the cup coaster.


You can add this picture with Colorful squares cup coaster to the board in Pinterest so as not to lose the interesting idea of crocheting a cup coaster with cute squares.


Prepare your favorite crochet hook and thin yarn for crocheting a cup coaster with colorful squares using C2C technique.

I provide a pixel chart below, but if you need help figuring out how to crochet in C2C technique (corner to corner), please refer to my publications "How to Crochet Corner to Corner (C2C)" and "How to Decrease in C2C Crochet", which has a photo instructions.


Materials and tools:

- Crochet hook, size 1,25 mm.

- Yarn Anna 16, Seam (530 m/100 g). 
- Crochet Hook (size 1,25 mm). 

- Thin yarn (colors: white, blue, pink, green, violet, yellow) - I use yarn Anna 16, Seam (530 m/100 g).